Removing Tires: Difference between revisions
No edit summary |
No edit summary |
||
| Line 1: | Line 1: | ||
The process of removing a tire is best learned by having it explained to you by someone who is familiar with the process and trying it yourself with them. If you have never done it before, you should learn this way. However, if you have done it before and you are having difficulty, this description may help. | The process of removing a tire is best learned by having it explained to you by someone who is familiar with the process and trying it yourself with them. If you have never done it before, you should learn this way. However, if you have done it before and you are having difficulty, this description may help. | ||
[[Image:deflating.jpg]] | |||
The first step in removing a tire is to make sure you get as much air out as you can. Usually, this involves holding the [[tube's valve]] open and squeezing the tire a little at the same time. Once all the air is out, you need to make sure the tire beads (the steel wires which run inside the tire and sit inside the rim) get down toward the center of the rim. To do this, you need to work your way around the rim squeezing the sides of the tire together down into the middle of the rim. | The first step in removing a tire is to make sure you get as much air out as you can. Usually, this involves holding the [[tube's valve]] open and squeezing the tire a little at the same time. Once all the air is out, you need to make sure the tire beads (the steel wires which run inside the tire and sit inside the rim) get down toward the center of the rim. To do this, you need to work your way around the rim squeezing the sides of the tire together down into the middle of the rim. | ||
[[Image:tire-remove-1.jpg]] | |||
In almost all cases, you will need a tire lever to remove a tire. You will almost never need two or three, and you will almost never get a tire off without one. Start by hooking the smooth, round end of the tire lever under the bead opposite the valve stem (not the hook-shaped end). You should be able to pry the bead out a little bit over the rim without much trouble. Try to make sure that you don't have the tube caught between the lever and the tire, since that will make it very difficult to slide the lever along the tire. | In almost all cases, you will need a tire lever to remove a tire. You will almost never need two or three, and you will almost never get a tire off without one. Start by hooking the smooth, round end of the tire lever under the bead opposite the valve stem (not the hook-shaped end). You should be able to pry the bead out a little bit over the rim without much trouble. Try to make sure that you don't have the tube caught between the lever and the tire, since that will make it very difficult to slide the lever along the tire. | ||
[[Image:tire-remove-2.jpg]] | |||
Once you have a little piece of bead over the rim, you need to clamp your thumb down on the bead where it crosses the rim behind the lever. This is to keep it from sliding back over as you move the lever away from you and peel more of the bead over the rim. | Once you have a little piece of bead over the rim, you need to clamp your thumb down on the bead where it crosses the rim behind the lever. This is to keep it from sliding back over as you move the lever away from you and peel more of the bead over the rim. | ||
[[Image:tire-remove-3.jpg]] | |||
Once you have done this, try to slide the lever away from you, peeling the bead off, but be careful, since it is very easy for your hand to slip and go into the spokes, which will always result in losing skin from your knuckles. | Once you have done this, try to slide the lever away from you, peeling the bead off, but be careful, since it is very easy for your hand to slip and go into the spokes, which will always result in losing skin from your knuckles. | ||
[[Image:tire-remove-4.jpg]] | |||
If you can get the bead started, the rest of the way around the rim will be easy. | If you can get the bead started, the rest of the way around the rim will be easy. | ||
[[Image:tire-remove-6.jpg]] | |||
Once you have one bead fully off, you can push the other bead off from behind, shoving over the rim in one spot, which will again make the rest come off easily. | Once you have one bead fully off, you can push the other bead off from behind, shoving over the rim in one spot, which will again make the rest come off easily. | ||
If this sounds confusing, keep in mind that this is a terribly difficult process to read about, but an easy one to ''see''. Ask a key volunteer to demonstrate it for you again, and it should make more sense. | If this sounds confusing, keep in mind that this is a terribly difficult process to read about, but an easy one to ''see''. Ask a key volunteer to demonstrate it for you again, and it should make more sense. | ||
Revision as of 21:46, 31 October 2006
The process of removing a tire is best learned by having it explained to you by someone who is familiar with the process and trying it yourself with them. If you have never done it before, you should learn this way. However, if you have done it before and you are having difficulty, this description may help.
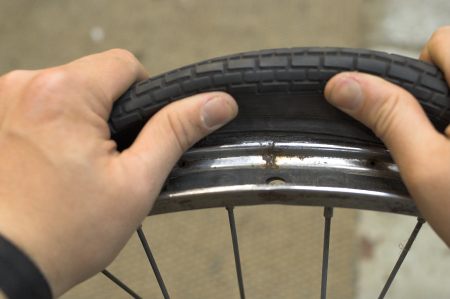
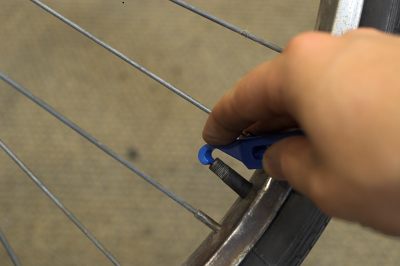 The first step in removing a tire is to make sure you get as much air out as you can. Usually, this involves holding the tube's valve open and squeezing the tire a little at the same time. Once all the air is out, you need to make sure the tire beads (the steel wires which run inside the tire and sit inside the rim) get down toward the center of the rim. To do this, you need to work your way around the rim squeezing the sides of the tire together down into the middle of the rim.
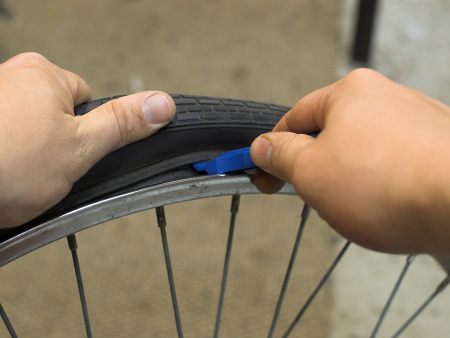 In almost all cases, you will need a tire lever to remove a tire. You will almost never need two or three, and you will almost never get a tire off without one. Start by hooking the smooth, round end of the tire lever under the bead opposite the valve stem (not the hook-shaped end). You should be able to pry the bead out a little bit over the rim without much trouble. Try to make sure that you don't have the tube caught between the lever and the tire, since that will make it very difficult to slide the lever along the tire.
 Once you have a little piece of bead over the rim, you need to clamp your thumb down on the bead where it crosses the rim behind the lever. This is to keep it from sliding back over as you move the lever away from you and peel more of the bead over the rim.
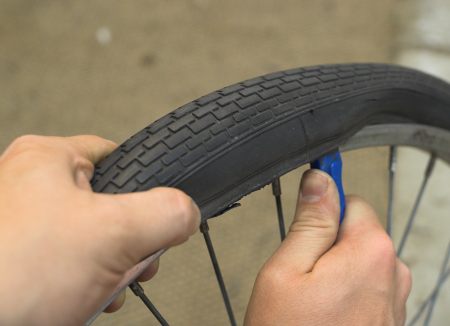 Once you have done this, try to slide the lever away from you, peeling the bead off, but be careful, since it is very easy for your hand to slip and go into the spokes, which will always result in losing skin from your knuckles.
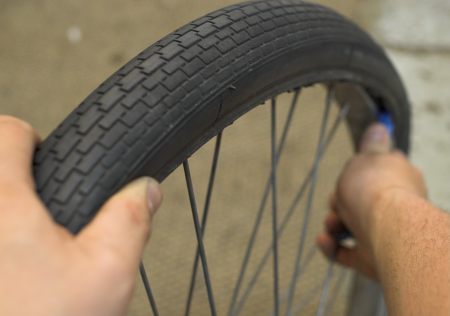 If you can get the bead started, the rest of the way around the rim will be easy.
 Once you have one bead fully off, you can push the other bead off from behind, shoving over the rim in one spot, which will again make the rest come off easily.
If this sounds confusing, keep in mind that this is a terribly difficult process to read about, but an easy one to see. Ask a key volunteer to demonstrate it for you again, and it should make more sense.