Shop Organization
How a shop is organized can help make it more accessible to new visitors and volunteers. A well organized shop also takes less effort to maintain, and helps reduce the amount of time spent searching for appropriate parts.
This page is an attempt at documenting the ideas, devices, and systems used by different bike projects to keep their shops organized and accessible.
Design Recommendations
Pre-Plan
Set your priorities with the 3-B's:
- Blue prints
- Budgets
- Builders
Contractors
Do what you do best - hire the rest. If you can't hire anyone, chances are you have a skilled volunteer you should get to know better.
Take Your Time
We can't always afford to do everything at once. Creata a timeline and break the project into smaller pieces and do that as you have time and as you can afford to do them. Saw dust also shows customers and donors that there is constant change and growth.
Stay Open
It is important to maintain your customer service through the everything.
Basic Design
- Traffic Flow: retail stores intentionally arrange things to make the customer walk by more things and spend more time in the store. You don't have to be evil about it, but you should still do this to avoid having people walking by expensive tools and also have them funnel past more information about your organization.
- Fixtures: These are what you hang things you are selling or giving away on. Try to get old ones donated from Local Bike Shops. Consider them an investment not an expense.
- Merchandising:
- Color: Paint the place with color tones that represent how you want the place to feel. Murals are great too, there is probably a graffiti artist in your area that needs to fullfill some community service hours.
Work Benches
These are all going to depend on how much space you have. You may only have room for a single master bench.
Salt Lake City Bicycle Collective
- We have a master bench, that has the less common and expensive tools.
- We tried to figure out what the most common tools used in our shop were and created 7 identical benches. From Left to Right.
- Professional Wheel Truing Stand with the three common Spoke Wrenches (Park Tool TS-2, SW-0, SW-1, SW-2)
- Pedal Wrench (Park Tool PW-3)
- Combination Wrenches (Cornwell Metric Sizes 17-10)
- Ball-Peen Hammer (Cornwell 16oz)
- Cone Wrenches: Two 13mm, two 14mm, two 15mm, two 17mm (Park Tool SCW-13, SCW-14, SCW-15, SCW-17)
- Crank Puller (Park Tool CCP-2)
- Crank Wrench (Park Tool CCW-5)
- Professional Cable and Housing Cutter (Park Tool CN-10)
- 8 & 10 mm AND 9 & 11 mm Metric Wrenchs (Park Tool CBW-1, CBW-4)
- Screw Type Chain Tool (Park Tool CT-3)
- Spanner for one piece cranks (Park Tool SPA-4)
- Chainring Nut Wrench (Park Tool CNW-2)
- 32 & 36 mm AND 30 & 32 mm Headset Wrenches and Lockring Hook Spanner (Park Tool HCW-15, HCW-7, HCW-5)
- Spoke Ruler also determines bearings and cotter pin sizes. (Park Tool SBC-1)
- Magnetic strip to hold a freewheel removers and bottom bracket removers. (Park Tool BBT-22, FR-1, FR-2, FR-3)
- Vice & Heavy Duty Axle and Pedal Vise Axle Vice (Wilton Armetale 4 1/2 In. Workshop Vise, Park Tool AV-4)
- We kept them low so people would talk and see each other. This worked out well for drilling holes on the top for more tools, but it is also a theft deterrent.
- P-Handled Star-Shaped Wrench for Disc Brake Rotors (Park Tool PH-T25)
- P-Handled 10-2 mm Allen Wrenches (Cornwell)
- Flathead screwdriver (Cornwell)
- #2 Phillips screwdriver (Cornwell)
- #0 Phillips screwdriver (Park Tool SD-0)
- Each bench has the most common shop supplies (see Shelves with Holes):
- Grease
- Chain Lube (big, refillable, non-pocketable container)
- 3/16 bearings (most front wheels)
- 1/4 bearings (most rear wheels)
- We got bigger tools and containers as a theft deterrent. Notice no tri-tools.
- Ugly bright colors sometimes covering the entire tool. We put the "girly" pink colors in the back of the shop so the younger boys would stay closer to supervision -- it works.
- Outlined the tools
- Hooks are zip-tied in place.
- Truing Stands were moved to face the side of the bench, creating more room and allowing someone two people to use the bench at once (one truing to the side, one wrenching).
- Benches were made using 2 ft. increments to make maximum use of 8' boards and 4' x 8' sheets of plywood.
- Bench tops are plywood with a thin (and replaceable) layer of ......
- Molding was put in the corner connecting the peg board from the bench top to prevent little parts from gettings stuck.
- We usually have a couple random tin-cans for people to put parts in. We also keep sand paper and tire levers in there -- Pink Pedros tire levers don't get stolen as often.
- Each bench has a small dust pan and broom hanging under the truing stand, makes for easy small parts cleanup.
- Bike specialty tools are Park Tool, however anything that was a generic hard line tool we got elsewhere.
Wheel Sorter
Instructions coming soon.
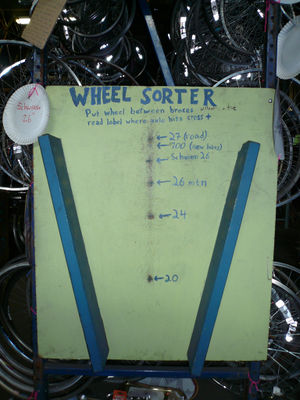
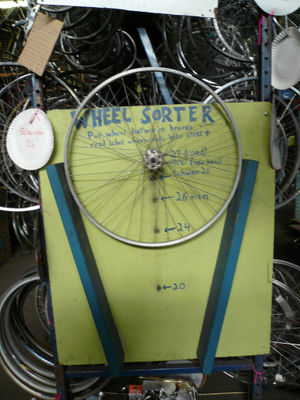
Free Ride uses a wheel sorter to help new volunteers figure out the sizes of different rims. Two 2x4's are mounted to a rigid backing to form a V shape. Smaller wheels can rest lower in the V than larger wheels. The sorter is calibrated by placing various wheels of known size in the V and marking where the axles touch the backing. When a wheel of unknown size is placed in the sorter its axel should lie very close to one of these marks.
Color Coded Bike
Free Ride has a bike mounted near the ceiling of the shop. The major systems of the bike are spray painted different bright colors. Cabinets, drawers, tool drawers, and just about anything else we could think of are marked with matching colors. This makes it easy for volunteers to figure out what drawer to look in for the part they need.
Tube Bins
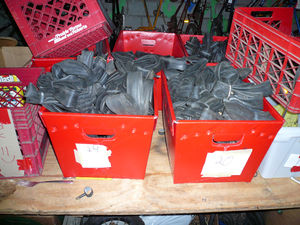
Free Ride has a big pile of unsorted tubes, many of which need patches. We have volunteers sort the tubes by size, check them for holes, squeeze out the air, fold the tubes up, then bind them individually with 'rubber bands' made from cut up tubes. These bundled tubes are sorted into smaller bins that are marked by the size and valve type of the tube they contain.
Tool Boxes
Free Ride checks out tool boxes containing a set of combination wrenches (8-15mm), 2 screw drivers, 3 allen keys, a 3-way hex socket, and a 3 way allen key.
Collateral
We keep IDs as collateral and make sure everythings there when its returned. This has significantly reduced the number of wrenches that wander away from the shop. It's also a good way to limit the number of people in the shop at any given time.
Wheel Rack
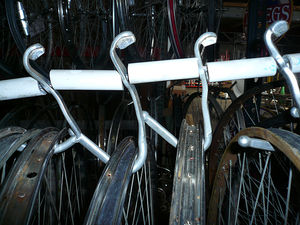
Free Ride stores wheels on hooks made of bent suicide levers. They are threaded onto high tension steel cable and spaced by short sections of PVC pipe. We need to rebuild ours using slightly more space between wheels to prevent entanglement.
File Cabinets
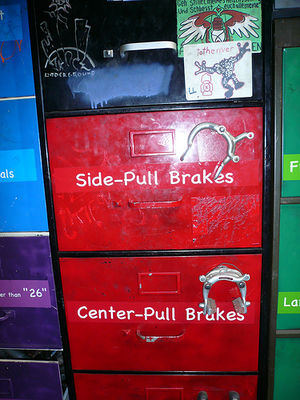
Free Ride stores components in file cabinets. The face of each drawer has an example of the contents bolted or wired to the front of it. This makes it easy for people to spot they thing they need, even if they're not sure of the name or location. The drawers also have the name of the part in vinyl lettering so that people can learn the names on their own.
Small Parts Drawers
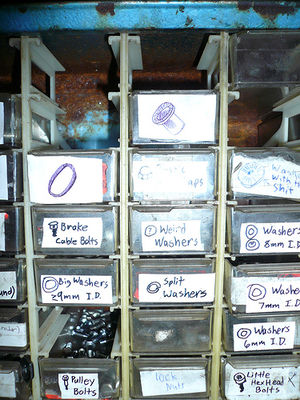
Free Ride has volunteers draw pictures of the small parts to go next to the names to go on the front of each small parts drawer. This makes finding the right thing a lot faster, even when you do know the name of the thing you're looking for.
Shelves with Holes
Using a combination of several different hole saws, you can create a shelf for various things like bearings, grease, chain lube and wd-40.
- 1/4" bearings (2 1/4" hole)
- 3/16" bearings (1 3/4" hole)
- Progold Grease (3 5/8" hole)
- 5.5oz WD-40 (2 1/8" hole)
- 16oz ProLink Chain Lube (3 1/16" hole)
- PPL-2 Park Polylube 1000 (4 1/16" hole)
Welcome Kiosk
Write down all the questions that people ask when they come to your shop and you will start to see trends in questions. While it is always best to have a volunteer or staff be a greeter it can help to have those frequently asked questions with responses posted somewhere. At the Salt Lake City Bicycle Collective they were given an old Kiosk from a bank and a college student project made the sign.


